HOW TO SET UP RAID
ON YOUR PC
In conceiving this article on how to set up RAID, I
remember that back in the 80’s and 90’s the computer environment in
which
I worked required fault tolerance. This means no data loss. All of
our data was duplicated on mirrored drives, and was always
available even in the event of a disk crash. If a hard drive failed, it
was replaced with a new blank drive that was then resynced in the
background while operations continued using the healthy drive. Hard
drive failures became almost transparent.
With
the recent replacing of my computer and all of its
upgrades, I realized there was the possibility of adding a mirrored
hard drive at a very attractive price. The RAID 1 and RAID 5 or
mirrored hard drives are the only solution that will maintain fault
tolerance. The hardware of most new motherboards will satisfy the
requirements of the how to set up RAID (Redundant Array of Independent
Disks), but if you’re not sure, check the specs. RAID controller
software is built into all of the
Windows Operating Systems since Windows 2000 and supports RAID 0 and
RAID 1. Also is included in all of the Mac Operating Systems beginning
with Mac OS X
10.4 and Disk Utility version 10.5 and it supports RAID 0 and RAID 1.
The RAID system comes in two flavors plus several
combinations of both. The first is the striped or RAID 0
configurations; this breaks the data into multiple parts to improve
reading and writing speed. Consider a Name and Address file; the Name
would be located on one drive, while the Address would be located on
the second drive or split between a second and third drive. This
allows the computer to acquire the data faster by having all of the
drives in the set provide their part of the data almost simultaneously.
The
second is the mirrored or RAID 1 configuration; where the two disks are
mirror images of each other. This is a fault tolerant set, where if one
of the drives fails the other will continue to operate the computer. It
then becomes a maintenance issue to replace the failed drive and
perform the resyncing operation.
A more historical view of RAID
is covered by this linked
article.
The improvement in data throughput speed for computers
using RAID 0 becomes more apparent in systems that heavily use the hard
drives, such as servers. This can mean saving hours of data processing
time on large servers farms. While in local workstations this advantage
becomes negligible.
RAID 1 offers almost no advantage in data transfer speed. Its
advantages lie in its ability to dynamically maintain a duplicate copy
of everything on the hard drive in real time. This allows you to be
protected from certain types of hard drive and computer failures. While
no protection is 100%, this one is very good. But, I still use the free online backup from Mozy as an
off premise
backup service
for my most important data. This is done in the
background, automatically several times a day.
With my knowledge of what a fault tolerant system is, I
began my expedition into how to set up RAID, by making my computer into
one that is fault tolerant.
The first step was to get a new hard drive; one that is the same make,
model and speed as my existing hard drive. Next I had to physically
install the drive in a drive bay far enough away from the existing hard
drive as not to cause overheating in the other drive. Then the
electrical connections were
made; both SATA and power. This was the easy part, now I had to figure
out how to tell the computer that this new drive was a mirror of the
original C: drive.
I spent several hours reading many RAID array tips on
converting to
a RAID 1 system and setting up RAID 0. This gave me the basics of what
is a RAID controller and how to set up
RAID conversion, but it did not have the specifics that I needed. The
next
thing I explored was the BIOS of the computer; it also was something
that I decided against tinkering with. Finally I started to use the
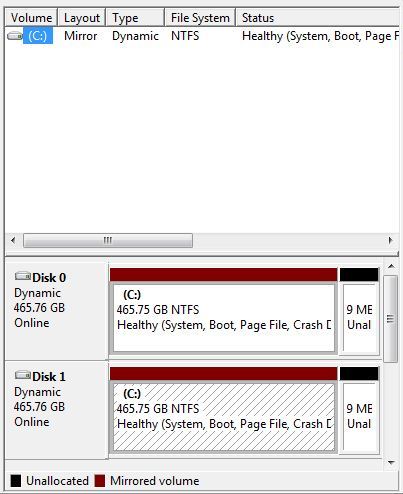
Windows 7 operating system itself. I opened the Disk Management table
(shown above)
and found my C: drive and the new drive (disk 1). The new drive was
shown as
being offline. By right clicking on the new drive (disk 1) a window
opened
allowing me to select “online”. This brought the new drive online. I
did not name this new drive because I wanted it to become part of the
C: drive pair. At this point I right clicked on the C: drive (disk 0)
and opened
a window that said “Add Mirror”, again which I selected. The process of
creating the mirror drive ran for about two and a half hours, but I was
able to use the computer in the interim. Since that time I have been
working with a RAID 1 or mirrored computer system. In the Disk
Management section under help there is a good SATA RAID tutorial
which will allow you to manage hard drives and how to set up RAID
systems. It’s
a good resource.
If you would like to comment, or add any
information to
this How to set up RAID on your PC page, please do so. Use the Contact
Us form and we will respond as
quickly as possible. If you would like to ask any questions, use the Questions
and Answers
form and an answer will be provided.
Return
from this page to Computer maintenance tips.
Return
from this page How to set up RAID to Build
a computer home page.
|